Let’s design a custom Kivy widget
Kivy is an open source cross-platform GUI framework running on Android, iOS, Linux, macOS and Window$. In this post, I won’t go into the cross-platform aspect of Kivy.
An interesting side of Kivy is its GUI description language named KV language, kvlang or the Kivy language. It allows to separate the interface design from the application logic.
So let’s see this in designing this widget step by step:
Our custom widget is a popup embedding a red moving rectangle. A use case might be to wait for a process that we don’t know how long it will takes to complete.
Prerequisites
Create a new projet, for this I use Poetry, install Kivy, and create the application script:
poetry new awesome_widget
cd awesome_widget
poetry add kivy
touch awesome_widget/app_with_kv.py
Don’t forget to initialize a git repository (yeah, even for a side project). Finally open this script in your favorite editor/IDE.
First thing first: the main application window
Before displaying a widget or anything else, we must have a main window. So let’s code it:
import kivy
kivy.require('2.3.0')
from kivy.app import App

class MyApp(App):
    pass

if __name__ == '__main__':
    MyApp().run()
First we import Kivy and give the version number (2.3.0 at this time), then we import the App class. Come the definition of the app class named MyApp which derive from kivy.app.App. Even if it’s not mandatory, we will see that it’s interesting to have the suffix App in this name to gain the automatic loading of the kv file. Finally, we instanciate and run the app.
So let’s run it:
poetry install
poetry run python awesome_widget/app_with_kv.py
poetry install allows to resolve dependencies, defined in the pyproject.toml file and installs them. You only have to do this the first time and each time you install a new dependency.
You must obtain this not so good but not so bad result:
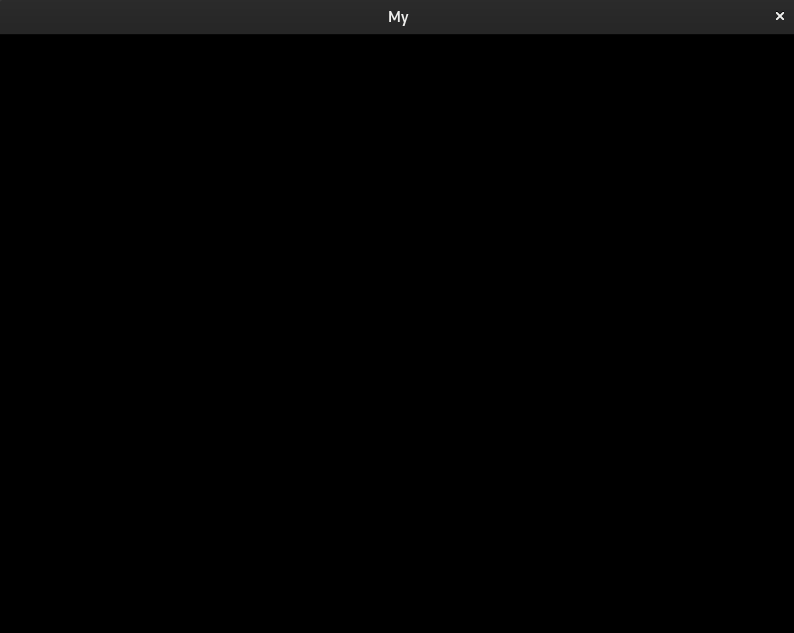
Notice the name in the title bar, it’s the name of our app class without the App suffix. Try to change the MyApp class name and observe the result.
Second step: the kv script and the first widget
Let’s create the kv script file with my.kv as name (the main class name without the “App” suffix):
touch awesome_widget/my.kv
As is, when we execute the Python script, the kv file is automagically loaded by Kivy. This is the first method to load a kv file, by name convention. The second one is with the method load_file from the Builder class (see How to load kv).
In the new kv file, let’s create the root widget with a button inside:
#:kivy 2.3.0

RootWidget:
   Button:
      text: 'This is a button'
A kv file is composed of rules which described the content of a widget. Here RootWidget is the root rule, and a kv file can have only one. Then we declare a Button as a child of RootWidget and define the button’s text property with “This is a button”.
#:kivy 2.3.0 is a special syntax which is equivalent to import kivy in Python.
If you try the code now you will obtain a “FactoryException: Unknow class <RootWidget>”. As you can see, the widget type of RootWidget is not defined in the kv file. You must create the RootWidget class and subclass it in the Python script, so let’s do it. Add this line in app_with_kv.py:
from kivy.uix.AnchorLayout import AnchorLayout

class RootWidget(AnchorLayout):
    pass
We created the class RootWidget which derive from AnchorLayout. The class AnchorLayout is a part of Kivy layouts which are containers used to arrange widget in a particular manner (see Kivy layouts to discover the other layout).
Now If you try the code, you should obtain this:
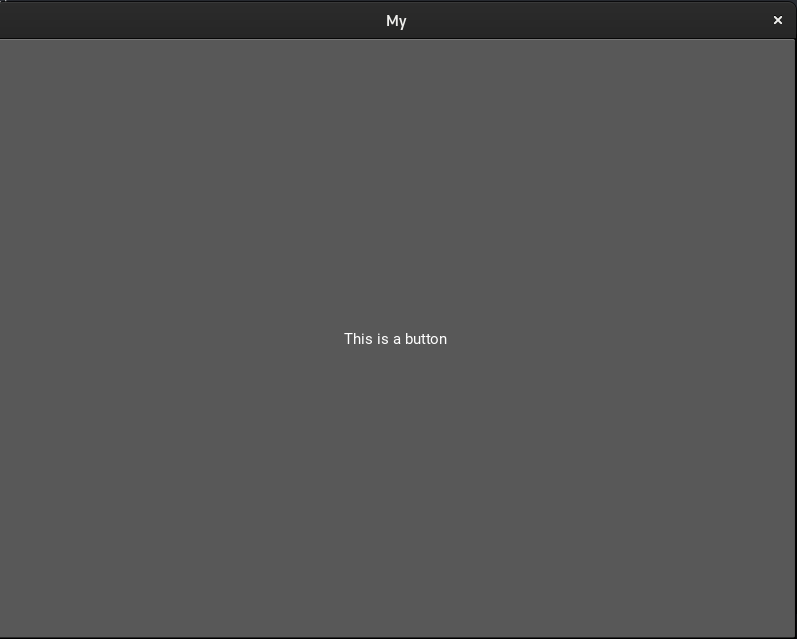
If you click on the button, it will be a color change but nothing more as we not yet bind an action with it. You will note that the button fill entirely the anchor layout. To change this, either you precise a size with the property size or a relative size with the property size_hint. If it not really needed, it’s better to change size_hint property which is defined by default to (1.0, 1.0). Add the following line after the text attribute:
size_hint: (0.9, 0.5)
The button has 90% of the application window width and 50% of the height. Now, we can move on the popup creation.
Next step: the popup
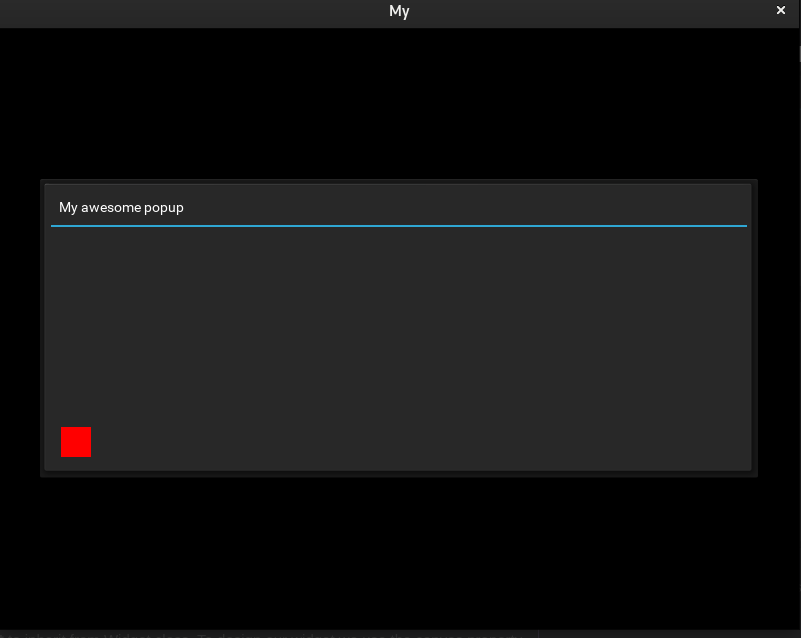
Here is the popup declaration:
<MyPopup@Popup>:
    title: 'My awesome popup'
To design the popup in kv language, we used a class rule definition, <MyPopup> as define here. As we don’t need to interact with the popup in Python code, we used a dynamic class declaration @Popup (see dynamic classes). The class MyPopup inherit from the Popup class. Finally we add the ttile property with the value “My awesome popup”.
Before to view the result of our code, we must display the popup and we will do it by pressing the button. We do it like this:
#:import Factory kivy.factory.Factory
.
.
.
RootWidget:
    Button:
        text: 'This is a button'
        size_hint: (0.9, 0.5)
        on_release: Factory.MyPopup().open()
This code opens the popup when we release the button. We use the Factory object to instantiate the Popup class and call its open method.
And here is the result:

As before the popup fill the window as we don’t give any hint about its size. So we add the following property to the popup:
size_hint: (0.9, 0.5)
Now that we have the popup, it’s time to design our (not so) awesome widget.
An awesome widget (no, not yet)
Here is the widget declaration:
<WaitBar@Widget>:
    canvas:
        Color:
            rgba: 1, 0, 0, 1
        Rectangle:
            pos: (10, 10)
            size: (30, 30)
As we designed the popup, we used a class rule definition <WaitBar>, and used the dynamic class to inherit from Widget class. To design our widget we use the canvas property of the Widget class where we define its red color, its position and size.
Now we must add it to the popup. A popup has a title and a content, we will add our WaitBar in the content’s popup like this:
<MyPopup@Popup>:
    title: 'My awesome popup'
    size_hint: (0.9, 0.5)
    RelativeLayout:
        WaitBar:
We made WaitBar a child of RelativeLayout because if we don’t, the position of our widget will have for reference the main window and not the popup.
Let’s see the result:
Have you notice that we have been so far without adding code to our Python script ?
IT MOVES ! IT MOVES !
Now we want to animate our widget, for this Kivy has an Animation class . It’s time to go back to our Python script. FIrst we will create the WaitBar widget which inherit from Widget class:
from kivy.uix.widget import Widget

class WaitBar(Widget):

    def __init__(self, **kwargs):
        super().__init__(**kwargs)
And we create a simple translation:
class WaitBar(Widget):

    def __init__(self, **kwargs):
        super().__init__(**kwargs)
        animation = Animation(pos=(100, 0))
        animation.start(self)
The red rectangle will move from its initial position (0, 0) to the final position (100, 0) given in the animation.
In the kv file, we change the fixed position of the rectangle by the position attribute of the widget:
<WaitBar@Widget>:
    canvas:
        Color:
            rgba: 1, 0, 0, 1
        Rectangle:
            pos: self.pos
            size: (30, 30)
If you test this code you will see the red rectangle translates from (0, 0) to (100, 0) in the popup relative coordinates.
A little aside
When you run the script from a terminal, you will see Kivy messages in the standard output. In general, you’ve got just information message, but sometimes you will see warnings or errors.
This time, there is a warning saying:
[Factory ] Ignored class “WaitBar” re-declaration. Current - module: None, cls: <class ‘main.WaitBar’>, baseclass: None, filename: None. Ignored - module: None, cls: None, baseclass: Widget, filename: /awesome_widget/my.kv.
When we created the class WaitBart in kv, we used a dynamic class, and made our class inherits from Widget. When we do this, the class is created and the parent class __init__ function is automatically called. But later, we have created this class in Python file with the __init__ function. So the warning saying that we re-declare our class.
Just remove the @Widget in the kv file to suppress this warning.
Now, it’s time to calculate the rectangle position at the end of the popup. For information , the default window size of a Kivy application is (800, 600) defined in the Kivy config.ini file.The popup has a 720 pixels width determined by its size_hint property (Window.width x 0.9 = 800 x 0.9 = 720). The content of the popup (RelativeLayout) is 696 pixels wide (measured by test). The rectangle has a width of 30 pixels, so its end position is 696 - 30 = 666.
Good, now we want the red rectangle to go back to its initial position, so the next animation sequence is:
Animation(pos=(0, 0))
To sequence the animations, just add it to the precedent:
class WaitBar(Widget):

    def __init__(self, **kwargs):
        super().__init__(**kwargs)
        animation = Animation(pos=(666, 0)) + Animation(pos=(0, 0))
        animation.start(self)
Finally we want to repeat this animation until the popup is closed:
animation.repeat = True
Some improvements
We can add some transistions to our animation, for instance:
animation = Animation(pos=(666, 0) t='in_out_cubic')
            + Animation(pos=(0, 0), t='in_out_cubic')
We change a little the ordinate of the rectangle and its start and end abscissa:
animation = Animation(pos=(656, 10) t='in_out_cubic')
            + Animation(pos=(10, 10), t='in_out_cubic')
But the rectangle initial position is (0, 0), so the first animation is a little bit weird, just initialize the initial position before the animation definition:
self.pos = (10, 10)
You will notice, if you click outside of the popup, this one closes. To avoid this, we set the popup auto_dismiss property to false in the kv file.
auto_dismiss: False
Make the widget resizable
If you try to resize the window, you will notice that our widget keeps its size. We will add the possibility to resize it.
To do this, we will use the Window class and its on_resize event. Let’s import the Window class and bind its on_resize event with our widget:
...
from kivy.core.window import Window

class WaitBar(Widget):

    def __init__(self, **kwargs):
	    ...
        Window.bind(on_resize=self.on_window_resize)
In the on_window_resize callback, we will adjust our widget size as the window size changes:
def on_window_resize(self, window, width, height):
    self.animation.cancel()
    self.animation = Animation(pos=((width * 0.9) - 64, 10), t='in_out_cubic')
	                 + Animation(pos=(10, 10), t='in_out_cubic')
		self.animation.repeat = True
		self.animation.start(self)
Our animation becomes a class attribute and first we cancel it, then we adjust the rectangle end position as the window is resized. For that, we multiply the current window width by 0.9 which is the value of the popup size_hint property, then we substract 64 which corresponds to the size of our rectangle (30) plus the border of the popup (24) plus the end offset (10) we want. Finally we set animation repeat to true then we restart the animation.
We are almost finish, but what if the default window size is redefined. We have a fixed end abscissa (656) for our animation. Let’s resolve this by modifying our animation definition:
self.animation = Animation(pos=((Winwow.width * 0.9) - 64, 10), t='in_out_cubic') + Animation(pos=(10, 10), t='in_out_cubic')
And that’s all, we obtain the desired result !
Closing words
We have made a custom animated widget and learned many things about Kivy. There is still much to discover. So experiment and have fun with Kivy and Python. The source code is available on Github.